|
FILM
TRANSFER INFORMATION
Most
people have questions regarding the film- to- video transfer process,
and this page is the place to find answers. Please use the "quick
links" below to find specific information, or simply scroll
down to read the entire content. If you don't find the information
you are seeking here, please feel free to inquire by email via
the "Contact" page. I will respond to all inquiries
absolutely as soon as possible- in most cases within 24 hours.
|
Super
8 And 8mm Film Explained
8mm
and Super 8 film was introduced as a "consumer level"
media for use by average folks in archiving their memories and
experiences- literally for making their own home movies. The moniker
"8mm" refers to the width of the film.
8mm
Film
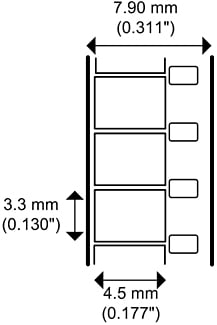
8mm
equipment and film was introduced by Kodak in 1932. The company
had spent many years developing an affordable and easy format
for the home user, and despite the economic effects of the depression
8mm film soon caught on and became incredibly popular. "Regular"
8mm film can be identified by its larger sprocket holes and smaller
printed image. Another identifier is the placement of the sprocket
holes, which are positioned to index in the spaces between the
individual frames.
Super
8 Film
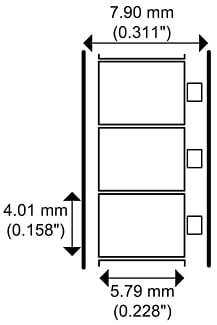
Super
8 film was introduced in 1965- again by Kodak, who had been searching
for ways to improve picture quality and ease of operation. Super
8 film offered several advantages including a larger picture size,
more uniform response of the film to light, more reliable film
cartridge performance, and eventually sound recording. Super 8
film features an image size that is about 1.25mm wider and .8mm
taller than Regular 8mm. It can also be identified by the smaller
sprocket holes which are centered at the middle of each individual
frame. Super 8 film may also show a magnetic tape strip running
along the edge of the film opposite of the sprocket holes. This
strip recorded sound in the same way that tape recorders do. Because
Super 8 sound film required different- and more expensive- cameras
and projectors it accounted for only 5- 8% of all sales, and as
a result is fairly rare today.
Top
|
Why
Film Should Be Transferred To Video
Natural
Disasters & Catastrophes
There
are actually several very good answers to this question. The most
obvious reason is to protect the content of the films from hazards
such as floods, fires, hurricanes, tornados, and a host of other
disasters that can befall the originals. Films that are archived
to MiniDV cassettes can be more easily stored in fire safes and
safe deposit boxes because they are smaller. A MiniDV cassette
measures 2.9 X 2.1 X 0.64 inches when cased, and holds one hour
of video footage. Compare that to the 3 X 3 X 0.49 inch dimensions
of the smallest 8mm reel, which holds about 3:20 worth of film.
It takes a total of 19 three- inch film reels to hold one hour
of imagery, with a required storage space of 6 X 3 X 4.7 inches.
This means that storing one hour worth of film reels requires
80.7 cubic inches more than a single MiniDV cassette. To put it
another way, 11 MiniDV cassettes can be stored in the same amount
of space as 19 three- inch film reels, yet the MiniDV cassettes
have the potential to hold 10 more hours of imagery than the reels.
Now, that is not to say that your film reels should be
transferred and then thrown away. Far from it! Your films can
still be enjoyed as they are for many years, but when it comes
to preserving the important content of those films- family history,
memories, and experiences- it's always a great idea to have copies
stored in different locations as a sort of "protection through
redundancy" against unforeseen and unfortunate events.
Vinegar
Syndrome
Vinegar
syndrome is another very good reason to archive films sooner than
later. This condition is a naturally- occurring degradation of
the acetate base of the film, and is often accelerated by improper
storage. According to scientific studies, acetate film that is
stored at 65°F and 50% relative humidity will last 50 years
before beginning to develop vinegar syndrome. The effects of this
condition are not reversible, and eventually cause the film base
to become so brittle that it literally falls apart. If caught
early, the emulsion on the film- the product that creates the
images- could once have been transferred to a new film base, but
this was an extremely costly process and the service is now all
but impossible to find. The earliest symptom is a "vinegary,"
acidic smell which is the basis for its name. The best way to
prevent vinegar syndrome is to follow the temperature and humidity
guidelines for storage that are listed above, and to store film
reels in ventilated cans- or no cans at all- as lack of ventilation
has been shown to be a contributing factor to degradation. In
any case, vinegar syndrome means the eventual loss of the film,
making early transfer to video a very good idea.
Previous
Transfers
Another
consideration deals with previous transfers that may have been
performed on the films. Film transfer services have been offered
for many years now, and frankly the "early days" of
affordable transfers are not necessarily remembered for their
successes. One of the more common situations that I have encountered
involves people who did the "right thing" and transferred
their films in the 1980s and '90s, when it was a common practice
to transfer film directly to VHS cassette. It's still common today,
in instances where the customer prefers VHS over DVD, and it's
even a service that Far Q Productions offers. In some of these
earlier cases folks were lucky, and their service provider actually
recorded the films to a digital video format before making VHS
copies. In many cases, however, they did not and what remains
now as an archive of those films is only a VHS cassette- which
does not offer the high resolution or color processing quality
of raw digital video. . . or even DVD, for that matter. To compound
the issue, some of these early customers then sent their VHS cassettes
in to have them transferred to DVD, but sadly there is no substitute
for making a high- quality transfer in the first place. The result
of VHS- to- DVD conversions of transferred film is often a heavily
compressed video that shows lower quality than the VHS tape. If
you couple this example with the obvious advancements and improvements
in technology that have occurred over the past 30 years, it's
easy to see why a person may consider re- transferring their films.
You have my personal assurance that in the course of transferring
films I will provide the guidance that is needed to avoid becoming
entangled in situations like the one cited above.
Preservation
One
final consideration when deciding whether or not to transfer film
reels is the protection of the original investment that was made
in them. The reasons stated above- disasters, vinegar syndrome,
and other calamities that can result in the total loss of films-
don't just represent danger for the memories and experiences that
are captured on the reels, they also represent a threat to the
work and money that your relatives invested in the film and equipment
that was used to capture those memories in the first place. A
concern that I have heard from some people is that the transfer
process seems costly; a concern that I shared for many years while
my family's films sat in basements and attics. However, when our
films were final gathered up into one location I was impressed
with the sheer volume of film that was there. I realized at that
time that a fair amount of money had been invested in those films,
and an even greater amount of time had been spent in editing,
repairing, and cataloging them. It occurred to me almost immediately
that the only way to waste that financial and personal investment
was to do nothing- to fail to archive and protect those images
that would become some of the only visual representations that
younger relatives would ever know of grandparents, uncles, aunts,
cousins, and family friends. I realized that these films contained
images of our homes, our cars, our cities and towns, and that
they would be a wonderful treasure for the youngest generation
of our family- and I also realized that they were completely irreplaceable.
It was then that I decided that it wouldn't just be "nice"
if they were archived- it was absolutely essential.
Regarding
the cost of transferring film, it's true that the equipment involved
in the process is expensive. It's also true that the job requires
knowledge, experience, and expertise. There are also material
and operating costs to be considered. With that in mind, I have
done my best to keep prices down so that this indispensable service
can be available for as many people as possible. While you may
find vendors out there who offer slightly lower prices, I think
that you will also find that in many cases those vendors are cutting
corners somewhere- or using "hidden fees" to discreetly
raise their rates. Honestly, there is so much negativity in the
marketing of this service that I really don't want to beleaguer
the point. I would rather simply state that the services offered
at Far Q are truly top- notch, and that there will never be any
"surprise charges" or any situations where you feel
that your film is being "held hostage" pending payment.
Top
|
The
Transfer Method
There
are many methods of transferring film out there- some of which
date back to the 1980s. The most common methods involve video
taping some type of "reflected" version of the original
film, either with a video camera pointed at a projection screen
or with the film image reflected through a "mirror box".
These methods make some sense at a glance, but they fall far short
of the goal upon further consideration. The reasons for this can
be quite technical, but sparing a Physics lesson they can also
be easily understood.
The
"mirror box" method uses a film projector, a video camera,
and a mirror box into which the film is projected. This method
works in much the same way as the toy periscopes that some may
remember from childhood. The inherent problem with this method
is that light from the projector- which transfers the imagery-
must bend and distort slightly upon reflection off of the mirror.
This bending of light can result in lowered luminosity or brightness
of the film, cause distortion in the projected image, and can
impede the true reproduction of color. Mirror boxes also create
a junction which is ideal for the introduction of dust, which
can almost imperceptibly degrade image clarity and sharpness.
The
"projection screen" method displays similar shortcomings.
In this process, a projector is placed in front of a screen, with
a video camera aligned directly beside it. Film is run through
the projector while video is simultaneously recorded by the camera.
The same rules regarding the bending of light apply here, although
at a slightly less radical angle of reflection. There is still
a loss of brightness in the picture, and color issues can arise
much more quickly and detrimentally because the screen color affects
the reproduction of the color from the film. Dust issues are an
even greater concern because the distance between the projector
and the screen is nothing more than open air, and that distance
must be doubled to account for the return of the image from the
screen to the video camera.
Probably
the most noticeable- and unpleasant- side effect of both of these
methods is a tendency known as "flicker". Almost everyone
has seen film flicker at one point or another. Flicker creates
a "jumpy", almost flashing reproduction of film when
it is captured on video. Flicker is actually caused by the film
projector itself, which is a principal instrument in both of the
methods above. This makes flicker a nearly unavoidable side effect
when film is transferred in either of these ways. The effect is
caused by the shuttering systems that most projectors employ.
The shutter system is made up of a series of "blades"
that actually cover the the gate that the film is projected through,
for the purpose of obscuring the transition from one film frame
to the next. When projected onto a screen, the effect of the shutter
system is minimized as the human eye naturally adjusts and perceives
the flicker as motion. When film is transferred to video- which
uses it's own "pulse" to depict motion imagery- the
effect is compounded and flicker becomes much more noticeable.
This amplified "flicker effect" leads quickly to eye
fatigue, and gives the final video product an unnatural and unfamiliar
look.
Far
Q Productions uses only true telecine equipment to produce High-
Resolution, and absolutely flickerless NTSC digital video of your
film. Our method employs a shutterless projection system and real
time frame- by- frame scanning of your film, which is projected
directly into the lens of a high- resolution camera that provides
the truest and best reproduction without distortion, loss of brightness
and color, flicker, or the introduction of dust and speckling.
Our telecine equipment is designed and manufactured by leading
industry professionals, and this ensures not only astounding video
quality but also safe and gentle handling of your film.
Definitions
for the
more "technical" terms above can be found on the "FAQs"
page of this website.
There
are several different telecine systems that are available for
use in this process. I chose a real- time method for several very
specific reasons. The first is that real- time transfer allows
for the capture of video onto MiniDV cassette, the advantages
of which are discussed in a later section. Other systems capture
video directly to a computer, but use slower or faster films speeds
to accomplish the task. This means that the digital video must
be sped up or slowed down to make it appear as "returned"
to its original frame rate, and that necessity can lead to problems
in reproduction- such as people walking at faster or slower speeds
than the film actually depicts. You never have to worry about
film speed problems with a real- time system, as your films are
projected exactly as they were intended to be. What you receive
in the end is video that behaves exactly as you remember it, with
picture quality that is actually improved due to the removal of
variable factors such as the effects of screen reflection.
Another
issue that arises from computer- based transfers is the "hands-
off" approach that it encourages. The post- production computer
processing of video files is time consuming, and is often left
unmonitored through completion and unreviewed at the time your
DVDs are shipped. The real- time method requires operator involvement
through every step of the process, which means that every minute
of your film is reviewed for quality and accuracy and that no
harm can befall your films due to automated mechanical damage.
Your films are always returned in fine condition- actually in
better condition than when they left your hands.
Top
|
The
Process
The
process used at Far Q is a fairly simple one, and is designed
to provide the best care for your original films while rendering
the best quality video possible.
Step
1: Film Preparation
When
your films are received, you are contacted to confirm delivery
and your order. Your film is then carefully inspected. Temporary
front and back leaders are installed, and any necessary repairs
are made using cement splicing techniques. Your films are then
cleaned and lubricated to provide for improved picture quality
and smooth operation through our equipment and your projector.
Our cleaner and lubricant were selected for their gentle effect
on your film, and also for their environmentally- friendly tendencies.
There is nothing caustic or poisonous in the products that are
used, and the carbon footprint of their manufacture is considerably
lower than that of other products.
Step
2: Film Transfer
Once
it is repaired, cleaned, and lubricated your film is loaded onto
our telecine and transferred to MiniDV cassette. The MiniDV recording
that is created in the process is known as a "Master,"
and serves as the high- quality backbone of the telecine product.
The master becomes the archive of your films, and can be used
for decades to make copies onto VHS tapes, DVDs, Blu- Ray Discs,
or any other format that is introduced in the future. The video
on the MiniDV master is then recorded to DVD, and from that DVD
any number of additional copies that you have requested are rendered.
These DVDs are not copy protected in any way, so they may also
be used to make copies for friends and relatives without the need
to return to Far Q Productions for further service. The temporary
leaders on your films are then removed, and your reels are returned
to their original boxes and condition- with the exception of having
been repaired, cleaned, and lubricated.
Step
3: Delivery
Once
your reels, cassette, and DVDs are compiled, you are notified
regarding return shipping. A "redundancy protection"
protocol is used to ensure that the content of your original films
can not be lost in its entirety. Your first delivery will contain
your MiniDV cassette, DVDs, and an invoice for your payment. Once
you have confirmed receipt of your first shipment, your second
delivery- containing your original films- will be sent. The two-
package system ensures that you retain either your original films
or your MiniDV master should something drastic happen during shipment.
These types of incidents are actually rare, but it is always better
to be safe than sorry. If for some reason your MiniDV and DVDs
fail to arrive, we know at least that your film is safe. If your
film fails to arrive, we know that you at least have your MiniDV
master.
Step
4: Enjoy your films and videos!
Complete
details regarding shipping and payment are available on the "Film
Transfers" page on this website, along with various package
pricing options.
Top
|
Why
MiniDV Cassette Is So Strongly Recommended
IMPORTANT UPDATE FOR 2021!
While the MiniDV video format remains as an excellent medium for film transfers, manufacturers have been phasing out production of the cassettes over the past few years. The prices for the cassettes finally reached a peak last year and became a cost that would be prohibitive for customers to incur.
The good news is that the DV format was designed to be "lossless" during transfers to and from computer hard drives! Thanks to this feature of the format, the digital video files can be captured on flash drives and external hard drives which can then serve as the true "archive" of the movie film transfer. From here forward, all film transfer projects will be archived using external hard drives and the hard drives will be included with the new media! As before, the video files can be used to created new DVDs or as a vehicle for high- resolution editing.
There is an additional cost for the external drives, but most film collections will fit on a single flash drive (or "memory stick" as they are sometimes called) so the extra cost will be minimal. At the time of this update, good- quality flash drives are available for under $10.00. Customers are only ever charged for the actual cost of the drives, so the extra expense is manageable.
There is still relavent information in the paragraphs below, so further reading is recommended!
---
For
many years now, various companies have offered film- to- DVD services
while assuring their customers that DVD is a true, "archival"
media type. While this approach has been accepted by many consumers,
there is one small problem with it- DVD is not an archival format.
I could begin quoting piles of data at this point, but the explanation
of why DVD doesn't make a good archiving media really comes down
to one element that is central to video itself- compression.
As
the term infers, compression is a method for converting large
amounts of data to a smaller overall size in order to allow it
to fit in a smaller space. By definition, "compression"
is not necessarily a bad thing. In the world of computers it is
used all the time, for example in WinZip or Adobe Reader files
where a large document is temporarily reduced to a manageable
size then "unpacked" for use. The problem with compression
as it relates to video actually begins with the size of video
data itself. Video requires a lot of information, and the higher
the quality of the video the more information it needs.
Over
many years of development in the field of video technology there
has been one hurdle that the industry can't seem to overcome,
and that is the fact that no digital video format to date has
proved itself capable of holding or processing as much video information
as video tape- including DVD! Video tape uses the DV format, which
is an acronym for "digital video". As with most of the
digital video formats, DVD uses compression for the purpose of
creating the video files that will be transferred to the discs
and recognized by DVD players. The difference is really in the
amount and type of compression that DVD uses, which follows various
protocols and in all cases requires a lot of compression. This
means that DVD video files are compressed by their nature, and
that there is no way around compression when creating a DVD. It
is possible to limit the amount of compression applied to DVD
video, but it can not be completely eliminated.
Compression
is such an important element in digital video quality that much
calculation and research has been devoted to it. Data transfer
rates are a good way of comparing various video storage methods.
The data transfer rate for a given media is an expression of how
much information that media can transfer per second. In this instance,
data is measured in Mb/s, or "Megabits per second".
As mentioned earlier, the amount of information a video file contains
determines the quality of the video it displays- meaning that
more information creates better video. Several examples of media
types and their data transfer rates include-
DVD:
9.5- 10 Mb/s, or approximately 4.5GB per hour of video
Hard
Drive: 25 Mb/s, or approximately 13 GB per hour of video
MiniDV:
25 Mb/s, or approximately 13 GB per hour of video
This
is where the MiniDV format serves its best purpose. MiniDV, like
all video tape, uses the "DV" format- which is
a compressed video protocol. However, it is a very sophisticated
format that uses much less compression than DVD and is actually
"at par" with the data transfer rates of the vast majority
of broadcast television that we see today. The rates above show
how MiniDV compares to DVD. This low compression rate makes it
the best high- quality system for storing the true archive of
films. Digital video as stored on these cassettes can be edited
in a non- destructive manner, and since MiniDV is one of the newest
formats of true digital tape there will be machines for playing
and recording the cassettes for decades to come. Even consumer-
quality video cameras that use this format can intuitively interface
with computers, which opens up an entire realm of archiving and
editing possibilities for those who choose MiniDV as their archival
media. Nothing looks better or is easier to use than MiniDV- with
the exception of uncompressed hard drive transfers that offer
data transfer rates between 170 and 270 Mb/s, but are also prohibitively
expensive to say the least.
This
beckons the obvious question, "Why transfer film to DVD at
all?" The answer is simple. DVD is a universal format, capable
of playback on standalone players and computers, and most people
agree that it offers better picture quality and more features
than earlier formats such as Beta and VHS. It also delivers better
quality than many modern computer- based formats like QuickTime,
Windows Media Player, and Flash video. DVD video- when processed
properly with minimal compression- really does look very good,
and the DVD quality that I offer stands up to any other service
provider out there. But between the compression that is applied
to the files and the destructive nature of DVD editing protocols,
it's hard to refer to DVD as an "archival format". In
short, DVD is the best choice for viewing; MiniDV cassette is
the best choice for archiving- and that's why I provide both formats
in every service package that I offer.
Incidentally,
I use quality MiniDV cassettes manufactured by Sony, Panasonic,
and various other makers. The photo at the top of this section
is for demonstration purposes only.
Top
|
Reel
Sizes, Running Times, And Media Info
The
most common questions that I field have to do with reel sizes
and running times, so I've assembled the chart below to help simplify
things. 8mm and Super 8 film utilize a very similar standard,
with identical reel sizes and capacities. Please note that every
reel is unique, so your reels will probably contain more or less
film than is listed below. This chart reflects approximations
based upon the original capacity recommendations from Kodak and
other manufacturers, and presumes a filming speed of 18 frames
per second- the standard frame rate for consumer level filming.
For film shot at 24 frames per second, the professional level
frame rate, the running time is reduced by approximately 25%.
8mm
& Super 8 Film
|
Reel
Size
|
Film
Footage |
Running
Time |
| 3-
Inch |
50
Feet |
3:20 |
| 4-
Inch |
100
Feet |
7:00 |
| 5-
Inch |
200
Feet |
14:00 |
| 6-
Inch |
300
Feet |
21:00 |
| 7-
Inch |
400
Feet |
28:00 |
MiniDV
Cassette Capacity
The
MiniDV Cassettes that are created by this process will hold up
to one hour of video each. This is because higher video quality
is achieved by recording more video data onto longer lengths of
video tape, which has the effect of shortening the running time
of the cassette itself.
DVD
Capacity
DVDs
that are created by this process also contain one hour of video.
This is for a similar reason as with MiniDV Cassettes, but one
that serves more of a "mirror image" purpose. Since
the DVD video format uses compression by it's very nature, it
is impossible to "turn off" the compression and record
raw video. In order to get the lowest possible compression level-
and by extension the best DVD video quality- shorter video times
are recorded to the disc, which in turn requires less compression.
The absence of a higher compression level naturally produces better
video quality.
Top
|
|